![]()
Framebuilding Process
This page is an explanation of the process I go through building a typical lugged frame. This one happens to be a lugged 29" mtb, but the process is the same for most lugged frames. This page may take little longer to load than my other pages as it's picture intensive.
|
|
The whole thing starts with a customer placing an order. Once that happens we talk quite a bit about their intended use and fit. From there, I design the frame on an Excel spreadsheet. The spreadsheet is a modified version of Mark Bugier's frame design spreadsheet. I've changed it quite a bit to provide me with measurements specific to my jig system and my tube mitering system. All the information I need is contained in this spreadsheet, no drawings are produced. Once the design is complete, I specify the lugs and tubing. I need to know the joint angles before I can decide on lugs and I need to know actual tube lengths before I can spec the right tube for the application. |
|
|
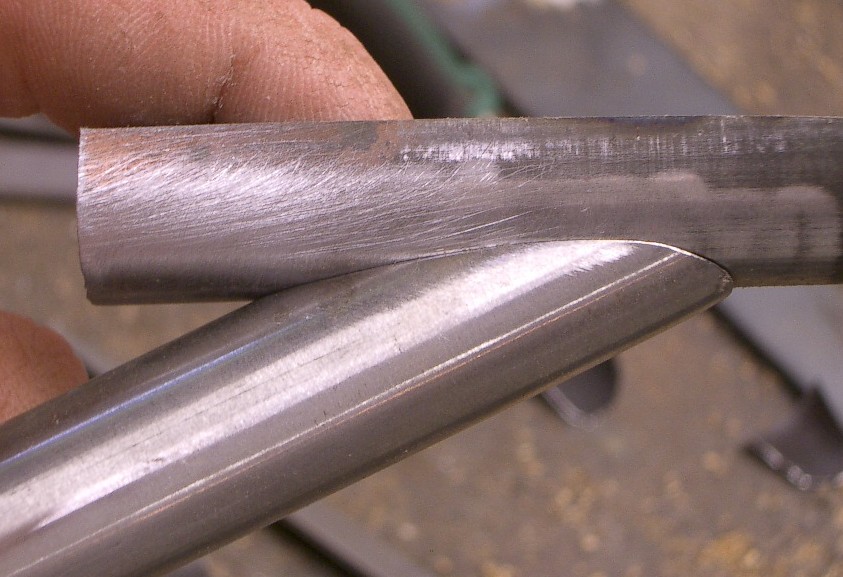
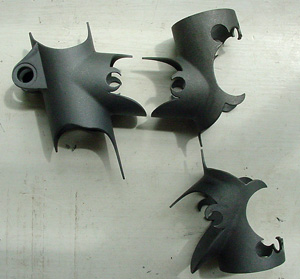
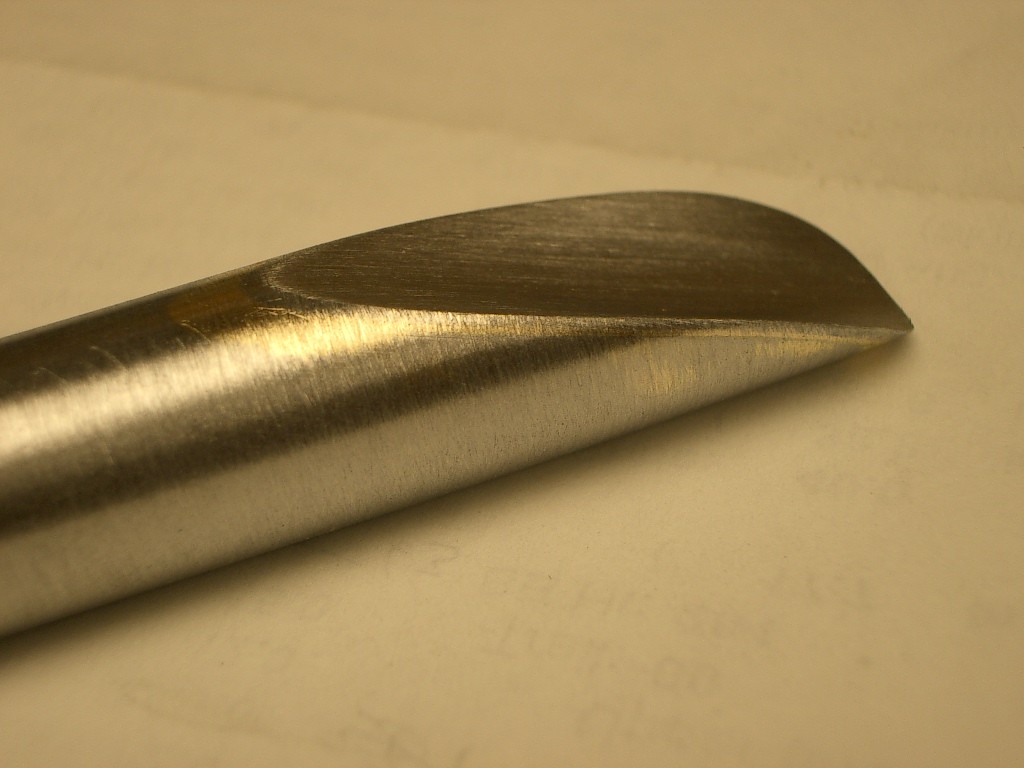
Lugs are the first thing I usually tackle. All lugs need prep work, these got quite a bit of carving done as well. This bike used Richard Sach's Newvex lugs. On the left is a picture (borrowed from Richard's site) of the lugs as cast. On the right are the lugs after I carve them up. |  |
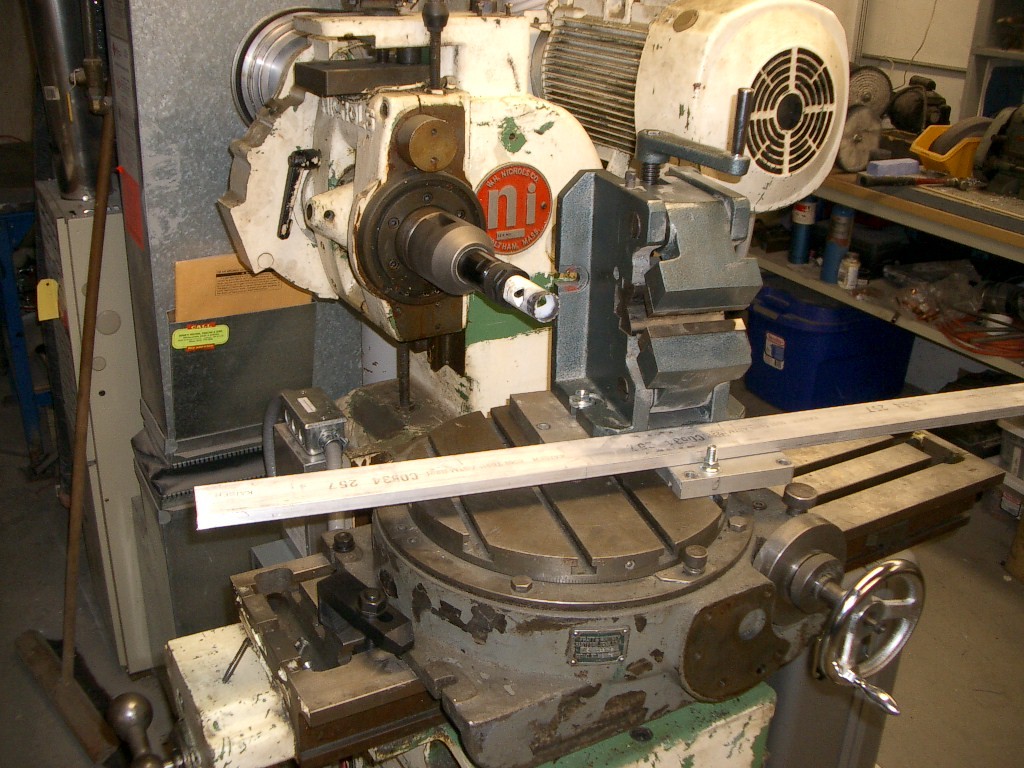
| Once the lugs are all
carved up, sanded and ready to go, I can start mitering
tubes. I use the machine pictured on the right to cut my
miters, I can set the angle of cut on the large rotary
table and then just feed the tube right into the cutter.
This mill set-up is very rigid and the cuts come out
spot-on every time.
The spreadsheet shown above gives me all the miter sizes and tube lengths that I need to cut the whole frame right now |
|
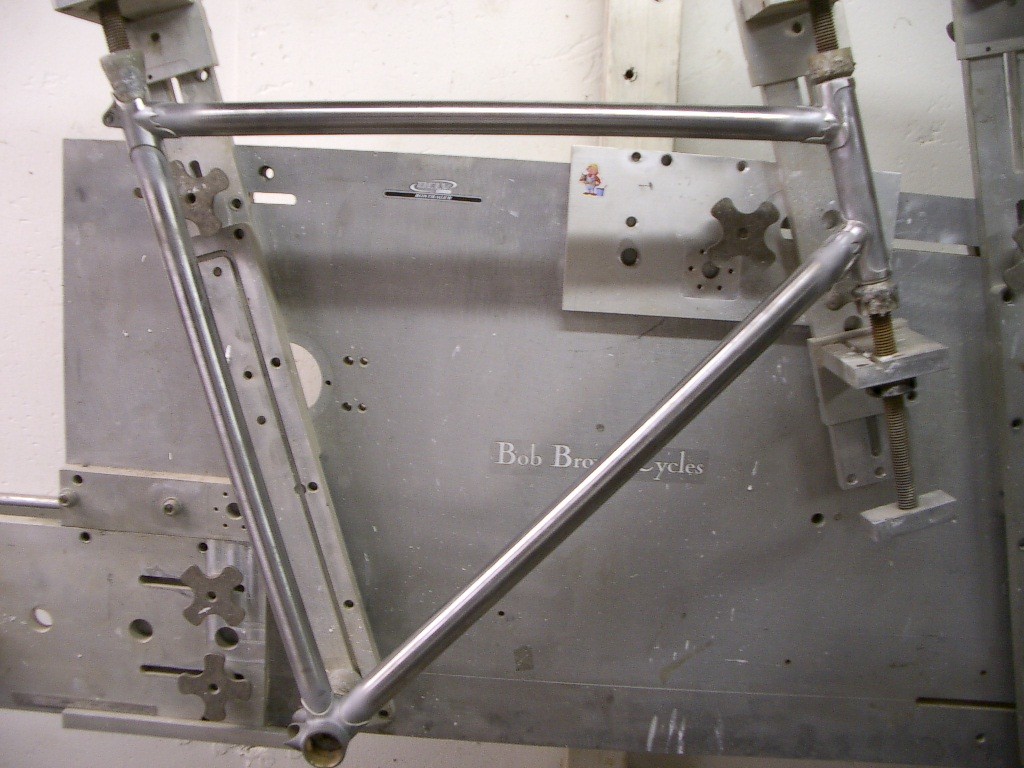
Once the main tubes are
mitered, I file the ends of each tube to de-burr them,
then begin test-fitting them into the jig. I always start
with the BB shell in my jig, then fit the seat-tube. Next
I fit the top-tube to the seat-tube, then the headtube,
and finally the downtube.
Once I confirm that the geometry is correct and the tubes fit properly, I take it all apart and sand all ends of the tubes inside and out and then flux them up. |
|
|
Here's the front triangle all set up in the jig, ready to tack. Next I'll braze one small part of each lug to tack the frame together, then I'll remove it from the jig and fully braze it in a workstand. Once it cools from brazing, I soak the whole thing in water to remove the flux. At left is what a lug looks like just after soaking. This picture doesn't show any excess silver since I fed the lug from the other side, but next I'll clean up any silver "flash" left from brazing with an abrasive blaster. |
|
|
Now it's time to work on the rear triangle. On this frame I had to start by bending the chainstays to the appropriate shape for tire clearance. I don't need to do this on most frames but 29'ers often need more tire clearance than I can get with stock parts. Once the stays have the right shape, I slot the ends for the dropouts and braze in the dropouts. I do this with brass as it fills the space between the dropout tab and the chainstay better. Once this brazing is done, they cool and the flux is soaked off. |
|
Next I have to make the scallops and shape the dropouts. This is one of those small details that really can make a frame look nice. the scallops must be just right with no undercutting into the dropout. I do this with a Dynafile abrasive tool, which cuts very fast, so extreme care must be taken to remove only what needs to be removed. Once I form each scallop, I shape the top and bottom of the stay-dropout to the desired shape. On this one you can see I filed in a small scallop on the underside of the dropout tab. |
|
|
Now that the dropout to chainstay joint is all shaped, I like to clean up the dropouts themselves. Most forged dropouts have marks on them where the forging dies meet, so I hand file these to nice square edges. Then I file the window out so it's nice and clean. There's a lot of detail work that goes into making a nice classic looking dropout. This area is probably the most time-consuming part of my framebuilding process, but if you want it to look good with paint, it needs to look good bare. |
 |
|
|
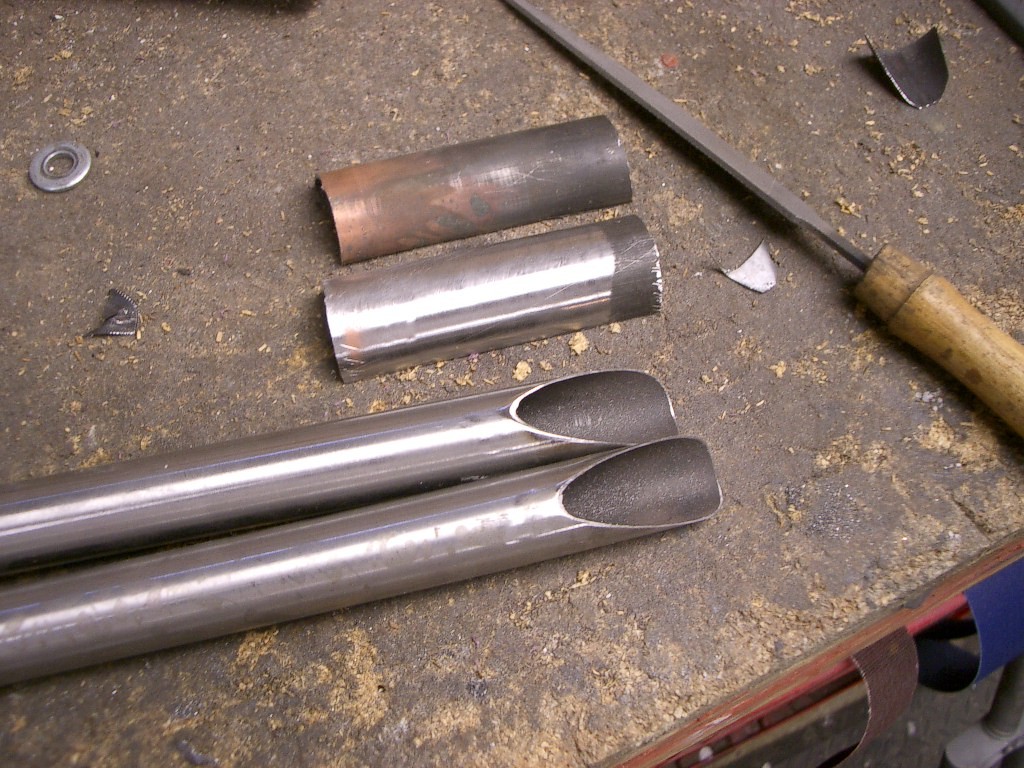
The seatstay treatment is next. This frame used side-tacked, scalloped seatstays, which is my most common method of doing it. I make my scallops from scratch and don't use plugs here. It's another nice touch and makes the frames lighter. I start off by filing the end of the seat-stay to a very shallow miter. They're sized to fit the scrap tubing sections I've cut up to make the scallops. I use tubing from 19mm to 25mm to make the scallops depending on the seat-stay diameter. |
 |
| Once the tubing if fitted
to the stay, I braze it in place with brass. No jigs
needed, just flux it up and hold the stay in a vice,
gravity will hold the tube scrap in place.
Once it's brazed, I grind to to a rough shape and finish file it down to the shape you see on the right. This one happens to be a 19mm stay with 25mm tubing for the scallop. On smaller stays I use smaller diameter tubing to keep things looking proportional. |
|
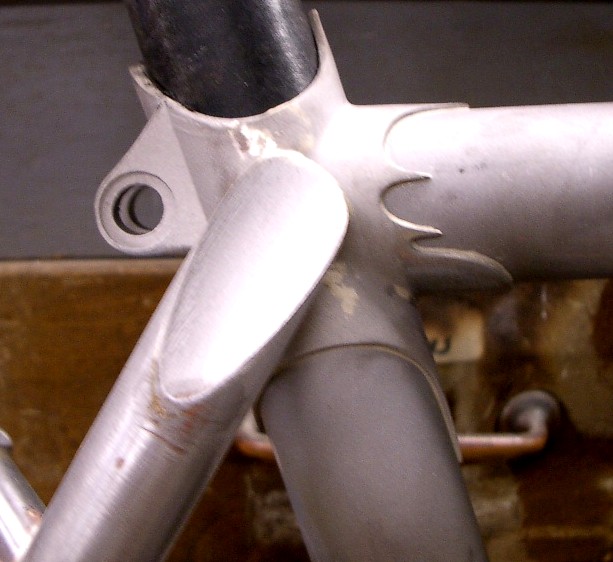
Now it's time to join those seat-stays to the rest of the frame. I cut them to the proper length, then file slots in the chainstay end of the stay. Then I file a small groove on each side of the seat-lug where the stay will contact it. This provides more surface area for the braze and makes the joint much stronger. Once all that is done, I mount the stays and braze them in place. The dropout end is done exactly as described above with the chainstays. The seat-lug end is just silver brazed right to the side of the lug as shown below: |
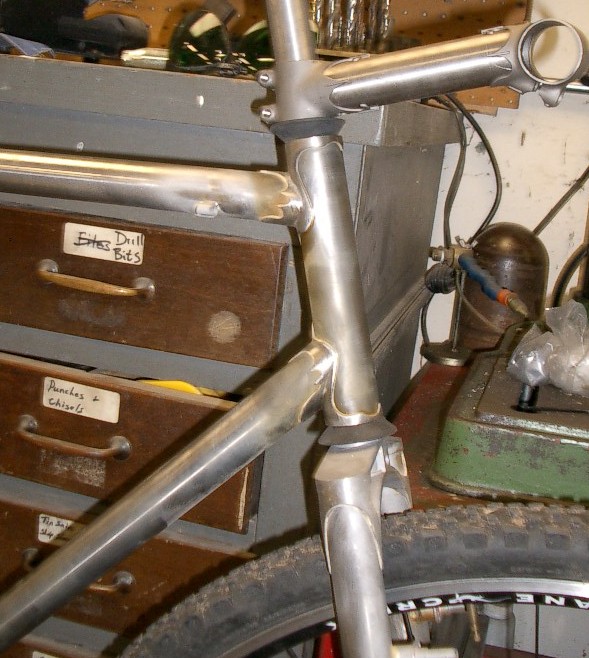 |
The main portion of the
frame is done now, all that's left is to clean up the
joints (abrasive blasting) and to install the braze-on's.
I usually install all the braze-on's next : bottle bosses,
cable stops, etc... then soak the whole frame one last
time, then blast it all.
Once that's done, I build the fork, and in this case the matching stem in the same fashion (shown left). Once all the fabrication is done, I do an acid etch on the frame and begin the painting process. |
 |
|
|
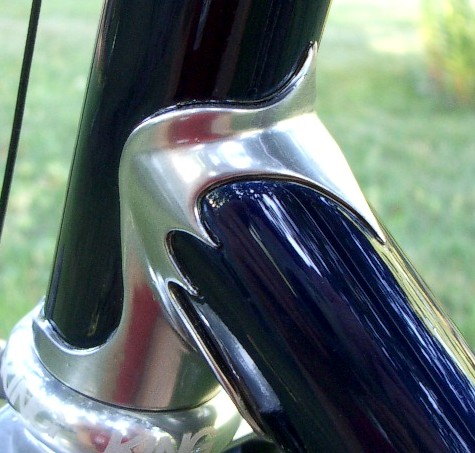
This frame had a very
unique paint job. The "chrome" on the lugs is actually
paint and the blue main color is a candy that is applied
to the clearcoat.
After primer and sealer, I had to paint the whole frame silver, then I clearcoated the whole frame with the candy blue. The frame was then baked overnight to cure the clear. Next the clear on the lugs had to be polished out to a perfectly smooth finish and then all the tubing around the lugs was masked off, leaving just the lugs exposed. The downtube logo was done in the same manner. |
كوتش اوتلت salesforce chatgpt prada pet carrier ship captain uniform the mix marketing chatgpt education 1k instagram followers adidas prada superstar amazing grace in cherokee native american prada snakeskin bag prada reedition 2005 green prada jacket prada blue bags prada loafers style prada ocean review williams chicken who bought chatgpt who own chatgpt free chatgpt alternative instagram reset followers tomagatchis pantone extended gamut pa supplier portal aaa catalina island packages prada campaign prada leather mules chatgpt npr prada robe chatgpt podcast prada men boots adidas store outlet mall carlucci's rosemont il beyonce instagram followers prada nylon sneakers puma outlet mall prada l'homme review nude prada bag prada luna black gucci fendi prada limitations of chatgpt elvis and lisa marie singing in the ghetto prada leather sandals prada sungless prada style captain shirt with epaulets pleasant holidays aaa prada sweat suit englewood ymca heels outlet lentes prada originales platform prada loafers prada calzature uomo big cork boards buy gucci dan 5.0 chatgpt 700 followers instagram coach美国官网outlet long goatees birkenstock factory outlet prada nude bag outlet prada captain's epaulettes yellow prada purse athenian academy charter school siding proposal sample comprar followers instagram prada paradoxe dupe prada blouse alfonso prada prada chest bag guvvi outlet clothing stores online prada gifts chatgpt 打不开 chatgpt dnd aselin debison the gift how much is gucci prada blouse women gucci com winthrop red apple instagram gain followers prada men's backpacks prada black reviews dr jacob amrani prada denim bra prada mini tote prada pr17 chatgpt 购买 prada oxford platform prada slide sandals ranking instagram followers prada lhomme review prada wicker clutch sheets of cork board prada women perfume carlucci cardinal building materials prada rimless sunglasses cardinal building supply st.louis prada sunglasses circle prada panty prada ballerina flats beard texture prada red sandals velvet prada bag outlet prada prada heel boots prada print yachting captains hat carlucci's rosemont menu fx .com botin prada chatgpt trading bot |
|
|
Once the hours of masking
were complete, I was able to spray the "chrome" finish on
the lugs and bake that paint overnight to allow proper
off-gassing. Once it was baked, I polished it out and
resprayed any areas that did not look perfect and baked
again.
Finally once I was satisfied with the appearance I removed all the masking and sprayed the final clear. The final clear is un-tinted and protects the chrome finish as it would any other paint. It also brings out the deep luster in the metallic. |
|
And finally, it's a completed bike:

Copyright 2007 Bob Brown Cycles LLC


