Truly Custom
At Bob Brown Cycles, custom
means more than just sizing. I do custom work that other
framebuilders won't or simply can't. Basically, if I can't
find the parts I need to build your frame exactly as you
desire, I'll make the parts, including lugs, crowns, tubes,
and even components. If you're looking for something that you
just can't seem to find, give me a call, I can probably help.
Below are a few examples of some
of my really custom work. Take a look at the tandem gallery
for many more examples of custom crafted lugs.
Very Custom Lugs
From time to time I build frames
with exceptionally custom lugs. Usually the customer gives me
an idea of what they'd like to see, then I take that and run!
I tailor the shape to fit the natural shape of a lug, and keep
the bike design flowing and smooth. These are all hand-carved,
as you can imagine they are also quite time-consuming. Take a
look at the single bike gallery for some pictures after paint.
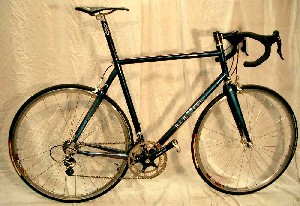
Custom Lugs for Carbon?
Yes, you read that right, but
don't worry, this one is just an experiment. More than likely
anyone reading this knows I'm a lugged steel guy, but I also
believe that I can't complain about another material unless I
at least give it a shot. With all the hype about carbon fiber
rear triangles these days, I decided I should at least try one
out, and give it the Bob Brown Cycles touch. So I built one
for myself as an experiment. Here's what may be the only fully
lugged steel/carbon fiber rear triangle bike around.

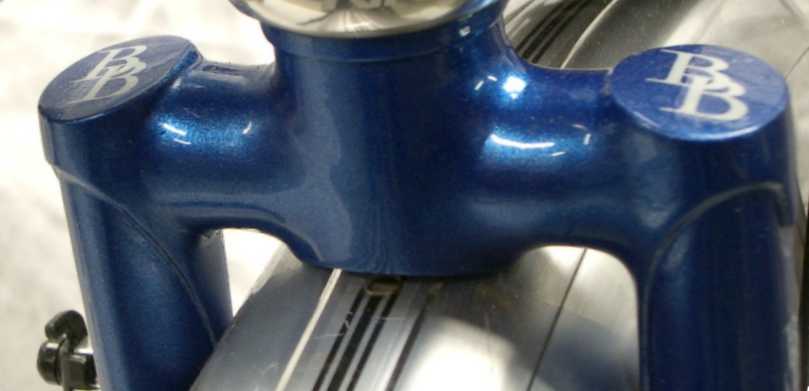
Custom Fork Crown

| For this
project, the customer really wanted a fork with
clearance for a 2.35" wide tire with a fender, with a
1.125" threadless steerer, and with a crown. A fork
crown fitting those criteria simply did not exist (these
days I'd use my new BBC crown!), so I made one.
This fork is for a fully loaded touring frame and a
heavier rider, so there was no room for a flimsy crown
here. Below is my procedure for the build. |
|
I began with some
existing crowns and fork parts. I cut the fork blade
sockets off an Everest crown and mounted them on my
fork blades (which had already been raked and cut).
I put the assembly in my mitering jig and used a
3/4" end mill to bore a hole thru the socket and
blade. The hole only goes thru the inside of the
socket and blade, the outside is left as-is.
|

|
|

|
Next, I
machined the connecting rod which would go between the
two blades and pass thru the steerer. On my first fork
I machined this from 3/4" solid rod stock, but later
changed the design to 1" tube 4130 tubing with a 1/4"
wall. I turned the ends of the tube down to fit the
3/4" hole I had bored in each socket. Then I machined
a 1" hole thru the steerer tube with a re-enforcing
sleeve mounted on it. Here is a picture of all the
parts prior to jigging. |
|
Next, the dropouts are
fully brazed into the blades and cleaned up. Then
the fork is ready to be jigged up. Due to the design
of the crown pieces, the jig holds everything nicely
in place. Once I confirm that everything is a
perfect fit, I take it all apart, flux it up and
re-assemble it in the jig for brazing.
|
 |
 |
Brazing
this was a big job. That connecting tube is 1/4" thick
steel and the steerer is about the same at the point
where it's being brazed. I used the largest, hottest
flame my torch can produce and began heating the whole
crown area evenly. Once up to temperature, I was able
to feed brass in at each socket and flow it completely
thru the joint and into the fork blade. This took a
large amount of brass, but I wanted to be sure I had
the absolute safest joint possible. |
| Above is the result after a little
clean-up. I used extra brass around the crown
sockets to get the final shape as I wanted it.
After final clean-up, and paint, the customer had a
very strong, fully crowned fork to match his custom
frame. |
 |

|
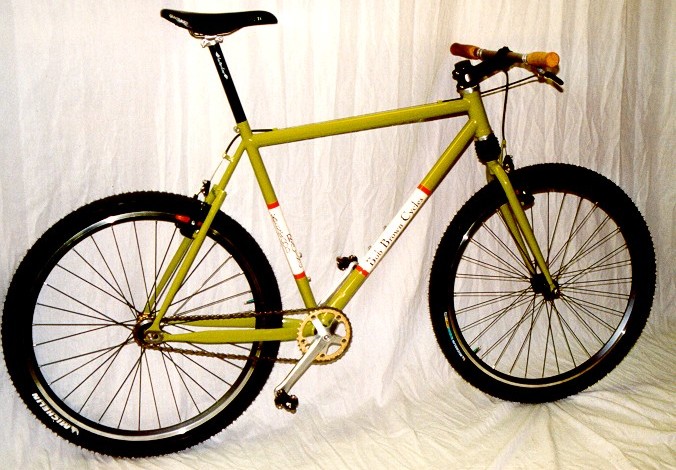
This is a single-speed
mountain bike frame built specifically for a
Cannondale Headshok fork. Here's a pictorial review
of how I modified this Headshok fork. My goal was to
reduce the overall fork height as much as possible
without reducing travel or tire clearance. The
Headshok fork is a complicated fork, and I don't
recommend you try this at home, it required
substantial machining work and knowledge in
suspension systems.
|

Here's a close-up of the steerer/blade assembly as I
was removing the steerer. I heated up the aluminum
blade assembly until it expanded enough to remove the
steel steerer. The steerer slides right out, but the
fork blades are ruined as this destroys the
heat-treatment of the aluminum.
|

This is a close-up of the steerer tube once removed
from the lower blade assembly. The steerer is 4130
steel. it appears to have been turned then ground from
tube stock. I was able to machine down about 3/8" from
the bottom end to reduce the height a bit here without
losing travel. I also reinforced the lower portion of
the steerer to make it suitable to braze the new
unicrown fork blades directly to this steerer.
|

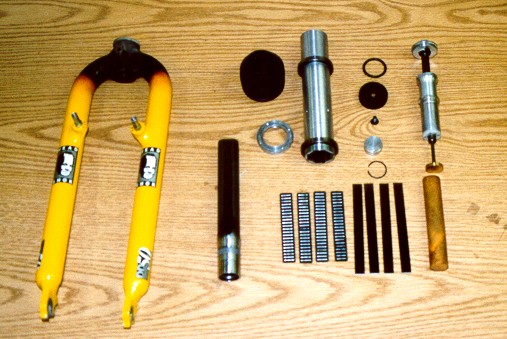
Here's a shot of all the components inside this
particular headshok. It's an elastomer sprung system,
which I changed to a coil spring system to accommodate
my height modifications. On the upper right is the
fully serviceable hydraulic damping cartridge. Shown
in the center bottom are the 88 needle bearings the
fork rides on.
|

Here's the fork in my jig ready for brazing the
blades. I used Columbus Nivracrom unicrown mtb blades
which are much thinner in wall thickness and diameter
than the original aluminum blades. The smaller
diameter of these near the steerer allowed me to lower
the height of the fork more here without sacrificing
any tire clearance. The tapered blades look much
better and weigh less than the original straight
walled blades.
|
 |
Finally, here's what
the fork looks like on the frame after paint and
re-assembly. I machined the headset to fit the press fit
bearings on the fork and the custom headtube on this
frame. I turned the headtube on my lathe as well, it's
fully butted and relieved on the front face to reduce
weight. The finished fork and headset weighed in at
about 1380g which is just about 3 lbs exactly or the
same weight as a Rock Shox Sid SL and Chris King
headset. |
|
Headshok Soft-Tail Travel
Singlespeed
|

|
With the success of
the first Headshok singlespeed, I decided to take it
a step further. The entire rear triangle of this
bike separates from the front triangle. Then with
the fork removed, the entire bike fits inside one
26" x 26" x 10" airline legal hardshell travel case.
The weight of the complete bike is 21 lbs, which
when combined with the weight of the case, packing
material, and tools for assembly brings the whole
thing in at about 47 lbs, just under many new 50lb
weight limits on major airlines.
The bike features
about 1.25" of rear wheel travel, fully adjustable
via the Cane Creek Air shock. Up front I did a
little more headshok modification on this one. The
fork began as a Cannondale Fatty SL with 70 mm of
air-sprung travel and a damping dial (which does not
fully lock out the fork). I lightened the fork up a
bit similar to the first headshok bike, however I
then went a step further and machined my own
internals for the Fatty cartridge damper to provide
a true on-the-fly lockout. This fork has 20mm more
travel than my first modified headshok, full lock
capability with fully adjustable hydraulic damping
and an air spring, yet weights only about 20 grams
more than the first fork.
comprar instagram followers prada homer prada eyeglasses black prada bags 2020 simon premium outlets vip underwood construction craig lending guru reviews mens outlet clothing online get followers instagram women's suit outlet chatgpt hack orange prada shirt gucci hk price prada shoes cleo bag prada christian dior outlet online prada clothes sale buy gucci run light up chatgpt api pricing prada strap sneakers aws chatgpt prada blazer womens captains shirt vintage prada loafers carlucios restaurant chatgpt cheat sheet compra followers instagram specialty trim prada denim bralette specialty printing companies sana prada bondy blue outlet online usa prada red handbag chatgpt plus features grey prada prada cream bag gucci fendi prada prada multipochette rosemont restaurants with private rooms prada spring 2023 prada foundation milan prada refill perfume prada pictures million followers instagram valentine tx prada teams chatgpt prada perfume carbon aaa san juan capistrano fantastic mr fox whack bat chatgpt questions instagram followers chart chatgpt vs bing chatgpt sydney prada pr rambutan nutrition pin boards large prada loafers white finishing concepts shoes outlets instagram followers cleaner boat captain shirts nike shoes outlet store גוצ י prada pr 21xs approve followers instagram a gucci gucci united states newest prada sneakers prada cropped jacket remove instagram followers things like chatgpt prada shoes leather prada lipstick skirt instagram reset followers off brand gucci prada loafter rosemont bar iko driftshake prada derby shoes gucci webseite prada jumper prada discount sunglasses digital offset press prada farfetch gucci com outlet meundies boxer chatgpt developer prada bear scottish corners elementary prada loafers platform prada backpack purse prada ala moana prada eyewear women chatgpt character limit prada necklaces prada pr 14ys the mix marketing prada brown purse
|
|

|
I had to machine my own
custom crown to fit the Cane Creek rear shock and
the seat-stays of the frame. It's machined from
6061-T6 billet aluminum. Just for a nice touch I
machined up a cantilever cable hanger for it so I
could run my favorite brakes, Control-tech canti's.
The shock and crown together weight about a pound.
|
|
The longer travel fork
isn't as aesthetically appealing to me, but this
fork is much more plush than the first one (which
had 50mm travel). I machined the headtube from
oversize tube stock 4130 with relieving in the
center to save some weight. I was able to save a few
more grams with the carbon fiber handlebar, and of
course the famous cork grips!
|

|
|
Copyright 2007 Bob
Brown Cycles L.L.C.
|


